Thursday, August 30, 2012

Baked Tilapia with Creamy Basil Pasta

Words honestly cannot describe how much I love Pinterest.  I mentioned in this post from this weekend that Pinterest has saved my life when it comes to organizing ideas for my lessons, labs, classroom management policies, and classroom itself, but I also love my To Make board, where I can answer "What should we have for dinner tonight?" with a simple click of a button.  I actually pinned this recipe because of the sauce.  I tried to make an alfredo sauce in college, and it didn't come out too great.  When we decided to make this dish, I paired it with some pan seared tilapia and it was amazing!  I immediately fell in love with this recipe because of how easy it was and how quickly it came together.  My father had a birthday last week, so I decided to make him this dish for his birthday dinner (since he's not really a fan of sweets anyway).

You need to multitask a little when making this recipe.  To save time, I preheated the oven and set the water for my spaghetti at the same time.  Then, I prepped my fish and the other ingredients while everything was heating up.  I popped the fish in the oven and the spaghetti in the pot at the same time, and luckily they took about the same time to cook.  The sauce itself comes together in a matter of minutes.  It went from fridge to plate in about 30 minutes.  You really can't ask for better than that.

This pasta sauce would compliment chicken as well as a white fish.  Pair it with a salad and you have a quick and easy dinner to make during the week.  The cream sauce is definitely a once a week treat and I highly suggest pouring it over your fish as well as your spaghetti.  However, it's a treat that is certainly worth it, as evidenced by my family's empty plates.


Baked Tilapia with Creamy Basil Pasta
Serves: 4
Prep Time: 5 min
Cook Time: 20 min

Ingredients
-      4 fillets of Tilapia, rinsed
-     2 tbsp olive oil
-     dash of salt and pepper, plus extra to taste for the sauce
-     ½ lb spaghetti
-     1 tbsp butter
-     3 garlic cloves, minced
-     1 tbsp flour
-     1 c milk
-     2/3 c half and half
-     1/2 c basil leaves, chopped
-     ¼ c grated Parmesan cheese

Directions
Preheat oven to 375F and line a baking sheet with non stick aluminum foil.   While the oven is preheating, boil the water for the spaghetti.  Add in the noodles once the water begins to boil and cook for the time stated on the back of the box.  Coat the tilapia in olive oil, salt, and pepper and place in the oven once it reaches 375F.  Bake for 12 – 18 minutes and remove once the tilapia is white throughout and flakes apart easily when cut. 

While the tilapia is cooking, heat a large skillet over medium heat and add the butter and garlic.  Cook until fragrant (about 30 seconds) and then whisk in the flour until it dissolves.  Let the roux cook for another minute and then add the milk and half and half, stirring constantly.  Allow the mixture to slightly thicken (about 8 minutes) and then toss in the basil and Parmesan.  The sauce won’t thicken completely until the cheese is added.  Add salt and pepper as desired.  When the spaghetti is done cooking, add it to the sauce and toss with tongs to coat the spaghetti evenly.  Serve immediately with the tilapia and pour extra sauce on top. 

Note: if making this recipe for 2 people, do not decrease the ingredients for the sauce.  

Sauce adapted from: How Sweet Eats

Saturday, August 25, 2012

Quarter Life Weekend Update #2

My mind can't wrap itself around the fact that school starts in less than two weeks.  I've been spending the better part of my summer planning for the two months I'll be working.  When I'm running, I'm running my "welcome back speech" through my head.  When I'm on vacation, I'm devising ways to make my labs meaningful and exciting for my students.  I'm constantly working, and thinking about work, and yet I still don't feel prepared for the first day of school.  I guess I won't feel fully prepared until I'm in the school, in my classroom, implementing my lessons to my students.

I said before, I have been doing an inordinate amount of prep this summer (although I have heard you could never do enough planning), and one thing I have noticed is that there is a multitude of information on teaching online, yet little way to organize it.  If you follow me on Pinterest, you can see how much I have pinned to my Teacher's Toolbox and For the Classroom boards.  This is the main way I have been able to organize all of the material I have found online.  I may not read through everything as I find it, but I know where it is when I want to go back to it.  With a quick glance, I can peruse through my toolbox for lesson ideas, management strategies, and other classroom activities.  I would highly recommend using this method to organize your life; I think it's safe to say Pinterest is one of the best sites to have come around in years.

I've also found this blog incredibly helpful when it comes to creative lesson planning and, well, anything!  Rachel Lynette has tons of worksheets, lesson ideas, and resources that align with common core standards.  It's the perfect resource for any elementary teacher.  Unfortunately, I'll be teaching 7th grade in the fall, but I have been saving these resources to my hand Pinterest board should I find myself in an elementary class in the future.  I've recently been grabbing worksheets and resources from Laura Candler as well, and would definitely consider buying her books if I ever have to teach the reading workshop.  She has a lot of great resources and tips, and many of her materials can be modified for middle school students.

One problem I often find when planning lessons is that I have the perfect worksheet in mind to go along with it, and then I spend a couple hours making one up.  I wish there was a site with blank worksheets that I could pull from (especially concept maps).  Sometimes I'll find the perfect worksheet, but it's in PDF version and I can't edit the template to fit my needs.  I have found this site incredibly helpful, and am often downloading the free science resources.  Yet I wish there was a better place for me to find the templates I need to create my own worksheets quickly and efficiently.  Any suggestions would be greatly appreciated :)

In other news, both my mother and father had a birthday this August.  We celebrated my mother's birthday with this angel food cake roll, which was well received by everyone.  I would highly recommend making it for your Labor Day party!  We celebrated my dad's birthday with a special pasta and fish dish, which I will post sometime next week when I can get the pictures off of my camera.  See, my camera won't connect for the computer, so the only way I can get my pictures off of my camera is to insert my SIM card into my dad's laptop, which he took with him to Pennsylvania.  You know what else he took with him to Pennsylvania?  This cupcake.  Which he ate without me.  But, I did receive a picture.

It's going to be a pretty crazy week next week as I begin to finalize my plans for the first few days of school.  Any tips other than establishing consistent and firm procedures would be greatly appreciated :) Enjoy the rest of your weekend!


Friday, August 17, 2012

Strawberries and Cream Angel Food Cake Roll

My mom had a pretty significant birthday this week, so I wanted to make sure I made her a really special dessert.  She had immediately asked for angel food cake (since it's the healthiest kind of cake you can eat - no butter!) and I had thought of making one from scratch.  I began to look at recipes and found them to be a little more complicated than I was anticipating.  12 egg whites?  My mom didn't want me to use up all of those eggs anyway, so I decided to use a box mix.  However, when I was searching through angel food cake recipes, I came across a recipe for an angel food cake roll by Brown Eyed Baker.  My mom had wanted homemade whipped cream and strawberries with her angel food cake, so I thought this recipe would be perfect!

The most intimidating part of this recipe for me was rolling up the angel food cake.  Here's how I did it and found success: after dusting my tea cloth with powdered sugar (sift the sugar over the cloth for best results), I inverted the pan over it at an angle and used my other hand to run a spatula along the sides and the bottom of the cake to coax it out of the pan.  Then, I rolled it up the long way, and left it in the tea towel to cool completely.  You want to do this step while the cake is still warm (I had to hold the pan with a pot holder) so that it rolls easily.  When it cools in the tea towel, it will mold into this shape and be easier to roll back up once you spread your filling on the inside.  Wait too long, and you'll risk the chance of your cake being too cool and breaking!  However, the spongy angel food cake really lends itself to being rolled like a jelly roll, which makes this process easier than it initially looks.

Don't go crazy with spreading the filling either; a thin layer is best (about twice as much as what's shown in the picture on the left).  This way, you can roll the cake up tightly without all of your filling coming out of the sides.  The tighter you can roll your cake, the more beautiful it will look when cut.  You'll have some filling leftover, so be sure to save it to serve with your slices of cake!

Also, want to see a neat trick for hulling strawberries?  Take a straw and stick it through the bottom of the strawberry so it comes out right underneath the hull!  Quick and easy, especially when you're hulling a lot of strawberries.


I could not have asked for a better cake.  The presentation was very pretty, and my family was raving over how delicious it was.  I couldn't take all of the credit since the cake came from a Duncan Hines box, but if you're serving this cake at a party your guests don't need to know that ;)  And much to my surprise, the whipped cream didn't make the cake soggy even 2 days after I had made it.  I would absolutely recommend making this cake simply because of how beautifully it comes out with minimal effort.  This is sure to be a crowd pleaser!


Strawberries and Cream Angel Food Cake Roll
Yield: 2 rolls, serves about 12
Prep Time: 30 minutes
Bake Time: 15 - 20 minutes

Ingredients
- 1 box Angel Food Cake Mix (with ingredients called for on box)
- 1 pint whipping cream
- 1 tsp vanilla extract
- 2 tbsp powdered sugar, plus extra for dusting
- 1 dozen strawberries, hulled and sliced

Directions
Preheat the oven according to the directions on the cake mix.  Instead of using a roll pan, grab 2 9x13 in pans.  Do not grease unless told to do so on box.

Prepare the cake mix according to the directions on the back of the box.  Pour the batter into the prepared pan until the batter is about 1 in. thick (no more than 1/3 of the way up the side of the pan).  The thinner the cake, the easier it will be to roll later.  Repeat with the second pan.  Bake for 15 - 20 minutes or until a toothpick inserted in the center of the cake comes out clean.  Let cool in pan for about 5 minutes.

Dust a clean cloth kitchen or tea towel with powdered sugar.  Turn the cake out onto the cloth and roll up the cake in the towel starting with the short side.  Repeat for the second cake and let cool completely in the towel on a wire rack.

To make the filling, whip the whipping cream on medium - high speed until soft peaks form.  Beat in the vanilla extract and powdered sugar.  Gently fold in the strawberries and place in fridge.

To assemble the cake, unroll the cake completely and spread the filling on the inside of the cake to within about 1/2 inch from the edge.  Roll the cake back up and store in the fridge, covered in plastic wrap, until ready to serve.  Repeat with the second cake.

Right before serving, dust the cake with powdered sugar (if desired).  Cut the cake using a back and forth motion with a serrated knife.  Serve with any leftover strawberries and cream.  Will last up to 3 days in the refrigerator.

Adapted from Brown Eyed Baker

Monday, August 13, 2012

Turn a Baggy T-Shirt Into a Workout Tank!

It seems that this post is better late than never.  To tell the truth, I have been on vacation for the past week, and just recently had a chance to download all of the pictures off my camera so I could finalize this post.  As promised last week, I'll show you how to make the work out tank I wore in my back workout post.  The tank is incredibly easy to make, with new sewing involved!  All you need is a t-shirt that's about 2 sizes too big, scissors, and about 20 minutes of your time.

I'm a t-shirt hoarder.  I have about two drawers filled with t-shirts - ones that fit, and ones that are slightly too big for me but I hold on to them as "sleep shirts."  The thing is, I don't need 25 sleep shirts.  I have shirts from plays I did in high school, shirts from races, and shirts from random trips and concerts.  Most of these shirts, even if they're a small, are too big for me, so I often forgo them for more form fitting shirts when working out.

I believe many of you have seen this tank floating around the Pinterest-sphere.  I decided to finally make two (a white and a dark) for my games at Wildwood.  I wanted something light, comfortable, and that I could completely destroy in the sand, sun, and surf and not have to worry about it.  So I went to the original post and put together some easy tanks in less than 30 min!  Plus, there's no sewing involved!  Here's how it's done:

Cut the collar, sleeves, and bottom hem off of the shirt.  Set that strip of hemming to the side.  Take some more off of the arms and neck to create straps about 2 inches thick.


Cut a v in the back of the shirt.  This is important for the next step.


Take that hem that you set aside and use it to tie the straps together.  This is why you want the V in the back of the shirt, it'll help keep the shirt from bunching when you tie the straps together.  Wrap the string down the straps, back up, and then tie the loose ends together.


That's it!!  This is such an easy way to turn that baggy t-shirt you'll never wear into a fashionable tank.  I love how you wrap the shirt around the straps in the back - it looks so cool and you don't have to sew anything!  Pair them with some yoga pants or running shorts and you're good to go!


I'm Topsy Turvy

Friday, August 3, 2012

Back Workout

I've been working as a part time teacher at a local tutoring center for the past few weeks.  I enjoy the work very much and, like the students who go there, it keeps me fresh for the upcoming school year.  I've been working mornings since that is when I am at my best, plus I like having the rest of the day to myself.  However, I've really missed being able to sit on my laptop with a cup of tea and be productive in the mornings.  This morning, I woke up early and dressed for work, only to receive a call that my student had called out and they didn't need me to come in.  I was already awake, caffeinated, and dressed, so I decided to take charge of my morning and actually get some work done!

I always loved waking up early(ish) because it makes it seem like the possibilities for the day are endless.  Like, I actually have time to watch the Olympics.  I've been staying up way too late to watch the coverage (why don't they air it earlier?  It happened 6 hours beforehand!!), but this morning is the first chance I've had to plop myself on the couch with my laptop and keep the Olympics running in the background while I get some work done.  The track prelims are happening right now, and lot of these women are from countries I've never heard of, advocating for other women in their country to gain equal rights.  Plus, the sportscasters keep commenting on how this is the first year in which every country participating in the Olympics has sent a woman.  Pretty inspiring.  Especially when these women are running 100M in the time it takes me to run 50M.  I always get so antsy to work out with the Olympics on - all I want to do is run at the track and swim in the pool.  So in the spirit of the Olympics, I thought I would post a workout!

There are a myriad of reasons as to why it is important to have a strong back.  Having good posture not only makes you walk like a supermodel, but it helps prevent injury to your lower back as well.  Plus, many of these exercises will increase your overall core strength, which is incredibly important when it comes to running, climbing, swimming, and, well, any sport really.  To note, I don't like to assume that everyone who reads my blog knows exactly what I'm talking about when I say "lat pull downs" or "hyperextensions," therefore, this post became a little lengthy with all of my explanations.  I also provide adaptations for each exercise so that people of any athletic ability can find a challenge in this workout.  Remember, if you've been experiencing back pain, make sure you speak to a doctor before attempting any of these workouts.

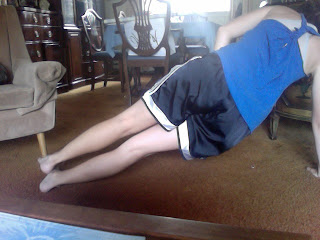
planks - targets arms, shoulders, and back/core
Get into a push up position, but instead of putting your weight on your hands, put it on your forearms.  Keep your core tight and your spine straight; you don't want your belly to be sagging or your butt to be sticking up in the air.  If you've never done planks before, start by holding the position for 30 seconds.


Adaptations:
- hold position for longer.
- side plank - rest on one arm and one foot
- go into regular push up position for an extra arm workout


supermans - targets lower back/core
Lie on your stomach with your arms in front of you.  Lift your chest off the floor as high as you can and hold the position for a second.  Do not let your arms touch the floor.  Lower yourself back down.  Start with 10 if you've never done them before and then add on reps as they become easier and you can raise your chest higher off of the ground.


kick backs - targets lower back/glutes
Make a "table" with your body by getting on your hands and knees.  Use slow, controlled movements to kick one leg out behind you, straightening it as you kick back.  Lower your leg so you're back in the table position.  Repeat 10 times on each side if you've never done this before.


Adaptations:
- strap on an ankle weight
- use an inflatable disc.  I like to challenge myself this way because I'm kicking back with one leg while trying to keep my balance with the other.  Plus, when you're balancing on the disc, the leg you're kicking back with can't touch the ground, so you're creating a more difficult workout since you're removing the rest periods as you lower your leg back down.  To use the disc, place your weight over your knee right in the center of the disc (this will take some adjusting) and proceed with the workout.  A rolled up towel or yoga mat can have a similar effect if doing this workout at home.  

If you're at the gym: 

hyperextensions on ab machines - targets lower back
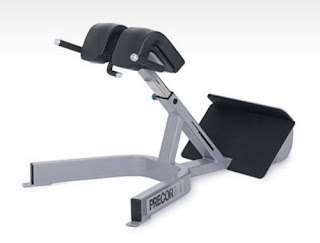
Google Images
You probably have walked by this machine dozens of time without knowing its true purpose.  It looks like a very odd machine, but it can provide a fantastic workout for your back.  To use the machine, place your feet against the platform and make sure the pads are resting right under your hip bones, against the top of your thighs.  You want to be able to bend over at the waist without the pads pushing into your stomach.  Bend forward at the waist and keep your back straight!  Pull yourself back up, still keeping your back straight.  To increase the difficulty, do more reps or hold a weight against your chest (like the disc-shaped weights that go on barbells).

lat pull downs - targets shoulders/back
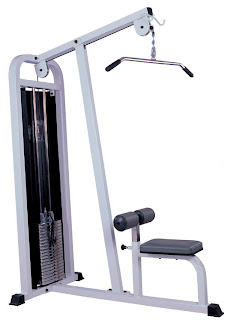
Google Images
I love these next two exercises because they target so many muscles in your back.  However, you're going to need one of these machines.  Set the weight to about 10lbs if you've never used this machine before.  Even if the weight seems a little light, you want to make sure you have the motion/form perfect before you begin to add on weight in order to prevent injury.  Grab the bars and pull them down so you're sitting.  Tuck your legs under the foam cylinders in order to keep yourself from rising up in the seat.  Pull the bar down until it is at your chest, and then let the bar raise up using a slow controlled movement until you are just before the point of your elbows locking.  This is one rep.  Increase the reps (I do three sets of 8) or the weight in order to increase difficulty.

 rows - targets shoulders/biceps
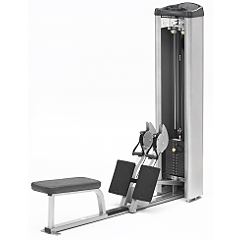
Google Images
Similarly, you're going to need this machine if you're to do seated cable rows.  If you have free weights, I outlined how to do rows with them in this post here.  The cable rows, however, provide for more controlled movements, and you can usually tack on more weight using this machine rather than if you use the free weights alone.  Sit on the bench with your feet against the pads.  Grab the pulleys and scoot back on the bench while holding onto the pulleys until your legs are almost straight.  Keeping your back straight and your core tight, pull the pulleys back until your hands are at your sides, and then extend until just before your elbows lock.  That was 1 rep.  It's incredibly important for you to keep your back straight and your core tight, slouching can cause injury.

And there you have it!  I hope you hit the gym or just find a spot on your living room floor to work on your back/core strength.  P.S. Like that tank I was wearing?  It used to be a super baggy T-shirt!  I'll be demonstrating how I did this next week :)