Showing posts with label crochet. Show all posts

Sunday, July 10, 2011

Flower Patch Baby Blanket

The girl I nanny for turned 1 a few weekends ago.  When I started working with this family, she was only 6 months old, couldn't sit up on her own, and had no teeth.  Now, she babbles all of the time, crawls around, and is eating solid food.  I wanted to make something that her mother could put in her room, like over the rocking chair, to give her room a little more color.  So, I reverted to my dozens of bookmarked crochet patterns to find one that would be right for this little girl. 

The first thing that I loved about this pattern was that the center of each patch looked like a tiny flower.  It was also incredibly simple, and I was able to make each patch in under 15 minutes.  The entire time to complete the blanket took about 3 weeks, which included days when I wouldn't be able to work on the blanket at all.  When I had the number of patches the original pattern called for, I laid them out and decided the blanket was too short even for a baby and adapted it to make it slightly longer.  I also changed the colors around depending on how much yarn I had left over and to achieve the look I wanted.  I love the way the blanket came out, however next time I think I will make it a little wider by adding another column of flowers.  I could have also made it with cheaper yarn and left it the size it is now and it would make a really cute throw rug.  I would definitely recommend this pattern is incredibly versatile because it lends itself to any color scheme, size, or function.
In Round 1, pull the yarn through the
center of the ring when you make
the clusters.

Flower Patch Baby Blanket
Adapted from Lion Brand's Bright Flower Throw

Materials
J-10 hook
2 balls of pink yarn
2 balls of red yarn
1 ball green yarn
1 ball cream yarn
Large needle
*I used Vanna's Choice yarns - nicer than the bargain brands like Red Heart and only costs a little more.  Plus they come in balls rather than skeins and therefore are much better to use for smaller projects where you won't need a ton of yarn.

Pattern - make 36 with pink, 18 with red, 17 with green, and 10 with cream

To finish Round 1, draw a slip stitch through
the top of the beginning chain in the first cluster
Ch 6, join with sl st in first chain to form a ring

Round 1: Ch 3, 2-dc Cl in ring, ch 3, (3-dc Cl, ch 3) 5 times, join with sl st in top of beginning cluster - 6 clusters at the end of this round.

Round 2: Sl st in first ch 3 sp, ch 2, (hdc, ch 2, 2 hdc) in same ch 3 sp as sl st, ch 1, *(2 hdc, ch 2, 2 hdc) in next ch 3 sp, ch 1, repeat from * around, join with sl st in top of beginning ch.
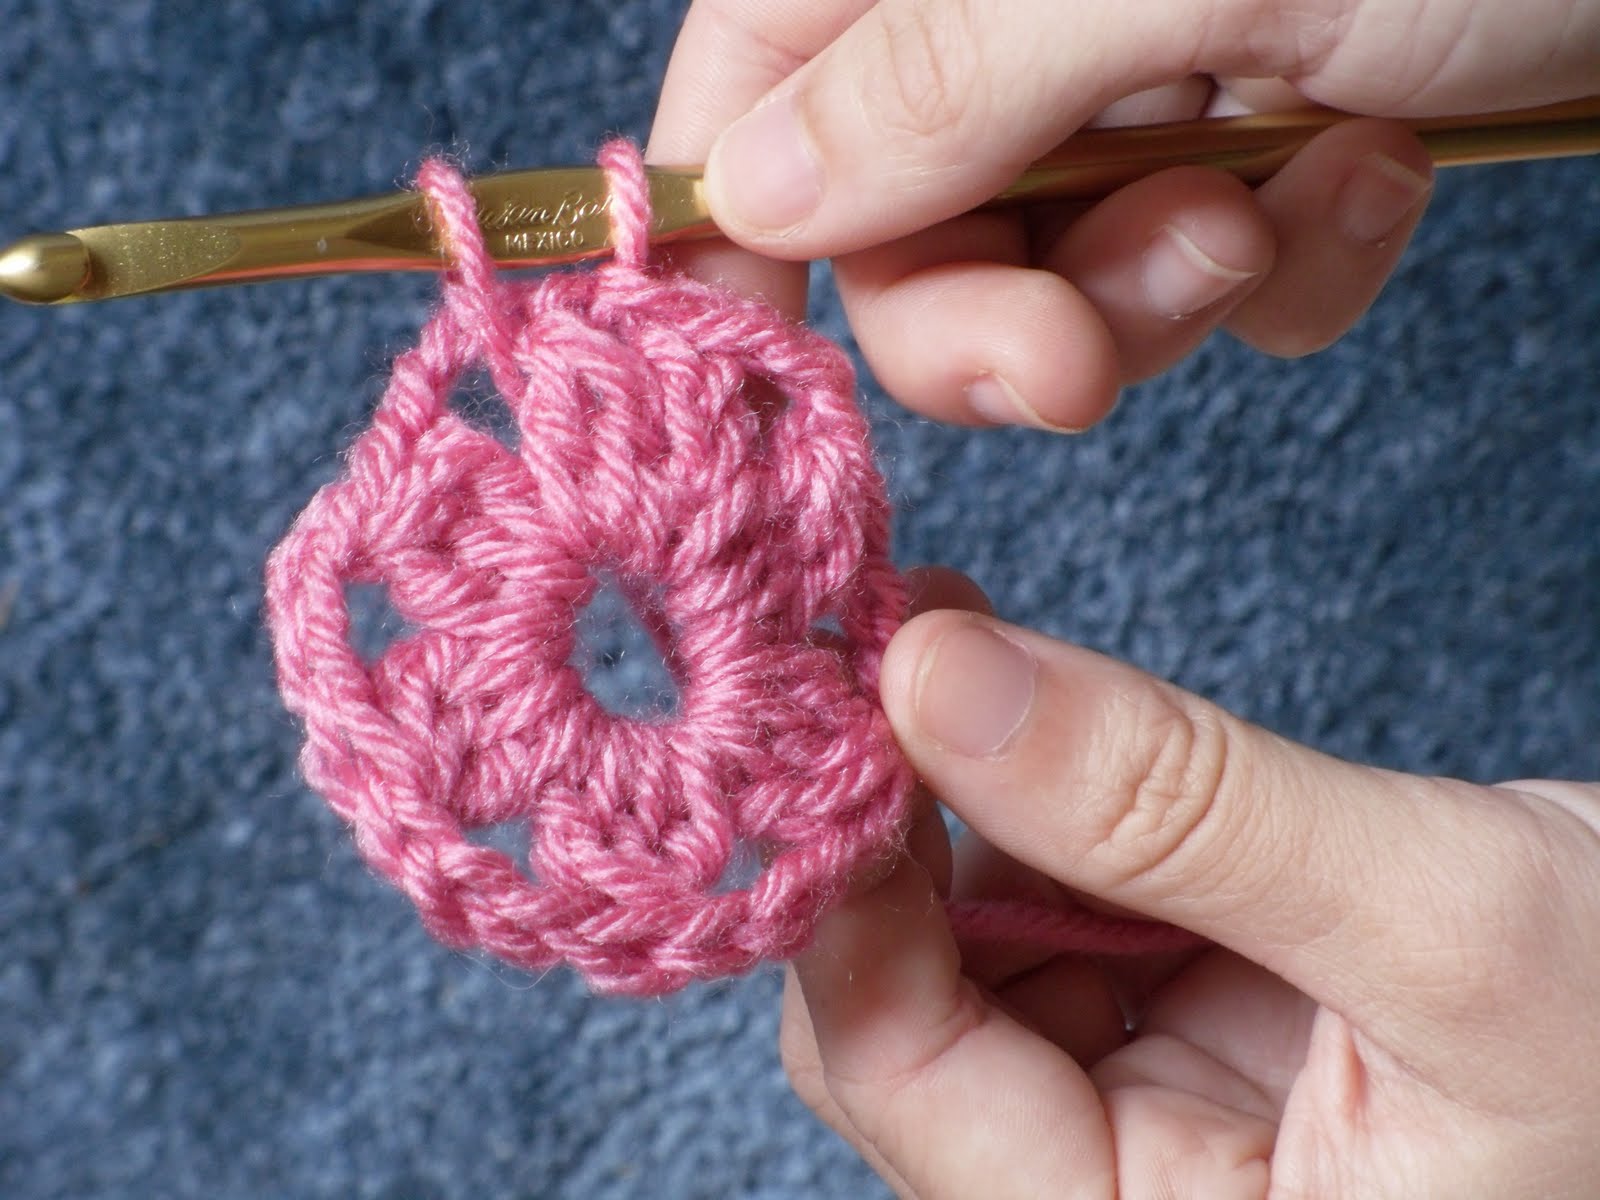
To start Round 2, draw another slip stitch
through the chain 3 space right after the first cluster
Round 3: Ch 1, sc in same st as sl st, sc in next hdc, (sc, ch 1, sc) in next ch 2 sp, sc in next 2 hdc, sc in next ch 1 sp, *sc in next 2 hdc, (sc, ch 1, sc) in next ch 2 sp, sc in next ch 1 sp, repeat from * around, join with sl st in first sc.
Fasten off and weave in ends

To finish: sew hexagons together to form flowers, lay out and fill in with leaves.

Stitch explanation
2-dc Cl - 2 double crochet cluster - (yarn over, insert hook through ring and draw up a loop, yarn over and draw through two loops) 2 times, yarn over and draw through all loops on hook (there should be three).
3-dc Cl - 3 double crochet cluster - (yarn over, insert hook through ring and draw up a loop, yarn over and draw through 2 loops) 3 times, yarn over and draw through all loops on hook (there should be four).
sp - space - the hole created by a chain (such as a chain 1 space).

For Round 3, chain 1, and then create the single crochet in the same stitch where you ended Round 2 with a slip stitch.  To assemble the blanket, I first sewed the flowers, then laid them out and filled in the spaces with the remaining green and white patches.  I used a basic whip stitch (over, under, over, under) to sew the patches together.

Wednesday, May 18, 2011

Crochet Forays

Just to warn you, this post is about some crochet projects I have made over the past few weeks.  I always get grief from my family and friends about my crocheting but I don't care if it's a hobby for old ladies it makes me happy and people enjoy the things I create.  This post goes into a pretty lengthy detail of my adaptations to the patterns I found online, so please feel free to skim this post and just take a look at the pictures :)

A couple weeks ago, I was attempting to clean out my room when I (of course) became distracted by the huge bag of yarn I had shoved under my desk.  I went online to my saved patterns and tried to think up of something to make with this extra yarn.  We always seem to have an excess of plastic bags in my house because we save them for when we walk the dog.  They're in the railing, in the pantry, under the desk, you get the idea. So, I decided to use the extra yarn I had left over to make a plastic bag holder.  I did not insert a picture of said holder into this blog because I made it with mismatched leftover colors of yarn.  The resulting product was an odd striped pattern, with some colors not even making it a full round and other colors taking up about a third of the project.  I adapted it from this pattern.  If anyone decides to make this, I would suggest that once you get to round 4 to just keep repeating that round until you get your plastic bag holder to the length you desire.  The pattern on LBY's site will leave you with a holder that won't fit too many bags.  

Whenever I am making a pattern that is crocheted in rounds and I need to change color, I always end up with this awkward breaking point between colors.  I had messed around with inserting the new color yarn during the sl st to fasten off the previous round and as the chain for the next round.  I think the technique that worked best was to use the new color yarn to create the sl st in the last round.  Then when I wove in the ends I would just try to cover up the colors to make it look like even rows.

Easter was just around the corner and I have a bunch of kids I work with and see often.  So, in the spirit of Easter and adorable animals, I decided to make baby duck and bunny Easter egg cozies.  In total, I made 8 ducks and 5 bunnies. Unfortunately, the picture that I took of the bunnies somehow got deleted off of my camera when I was transferring the pictures onto my computer, so I just have the picture of the ducks.  I adapted these patterns for the ducks and the bunnies.

The first duck I made I sewed the beak on backwards so the open end was facing outwards.  It produced a cute effect, but I decided to sew the rest on correctly.  I also hate using beads for eyes because they have a higher chance of falling off and aren't safe for very young children.  Sewing a perfect circle for the eyes can be tricky (see the duck in the back L corner), but towards the end I think I got the hang of it.  Always cut yourself a long thread of embroidery yarn and create a pyramid effect when stitching (stitches increase in width until you get to the center and then decrease to the same width as when you started) otherwise you'll get square looking eyes.  Beads are certainly easier but I would prefer to stick to yarn.  

The baby bunnies have a pom pom tail and I've never made a pom pom before.  A friend of mine had made some as a toy for her pet cat, but even after she described the process to me I was still lost.  The pattern on LBY was no help either, as they said just to refer to the packaging directions.  So, I resorted to YouTube and watched this video.  I made my own cardboard donut thingy and my first pom pom came out great.  The trick is to keep your fingers locked in the center while you are threading the yarn through the two pieces of cardboard or else the strings you cut will fall out.  

Next came the problem of attaching the pom pom to the bunny.  I first tried to sew the pom pom to the bunny but that left it too loose and I could easily pull  it off.  I could have glued it on with fabric glue but I didn't have any at my house.  So what I did instead (and what ended up holding up to a 3-year-old) was I sewed the pom pom to the bunny, then went back through the pom pom's center, and back through the center a second time and through the bunny.  This held on pretty well and was a good alternative to messy glue that might dry out and not hold up.

I then finished these projects by slipping them over Easter eggs with pieces of candy inside.  The kids loved to pretend the ducks and bunnies were pooping out eggs, so all in all I think this was a successful Easter gift.  

The second gift I made was for a friend who had just received her black belt in tae kwon do.  I could not make the ceremony but I wanted to do something special for her and this idea was actually suggested by her brother.  I adapted this pattern to make a tae kwon do blackbelt.  

To make the short sleeves, I just ended with the black at row 5.  The legs I ended at Row 11 because they started to get too long and the pants flared out too much.  When making the hands, I made Row 5 like this: (2 sc, sc2tog) 3 times for a total of 9 st.  Row 6 was (1 sc, sc2tog) 3 times for a total of 6 st, the same number of stitches as the sleeves on the arm.  I continued for about 3 or 4 more rows until the arms were as long as the legs.  When I use this pattern again, I probably won't work in the back loops on the dress, arms, and legs because it gave the outfit a raised striped pattern rather than a smooth one.  I attached and stuffed everything (except for the arms and legs).  To make shoes, just crochet the feet in a color other than the skin color.  There are so many different things you can do with this pattern but the best adaptation is what follows....

My absolute favorite part of this doll is the hair.  In the pattern, they said to crochet this fuzzy yarn into the head but I had an idea of my own: I thought I could get a better effect if I used a latch hook to attach the hair to the head.  I cut about 2 in size pieces of yarn and hooked them into the head, starting at round 7 (you'll see if you make this doll that the increasing pattern in rounds 1 - 6 creates a ridge, that's where I started inserting the hair).  I started with a short row (ended right above eye level), and with each increasing row I added another strand of hair on each side (Round 7 had 14 strands of hair, round 8 had 16, etc).  This created a diagonal line across rounds 7 - 13 and once I reached round 14, I followed the stitches in a circular pattern around the back of the head.  I filled in the hairs on the top and any spaces that may need them on the back of the head.  The hair still didn't look quite right, because the girl whose doll this was has tight curly hair.  I was reminded of the pom pom video I had seen on YouTube where the woman said to brush the pom pom out to separate the individual threads in the yarn.  I took a fine tooth comb and brushed the hair out to separate the threads and each thread came out curly (since the threads are twisted together to make the yarn).  I finished the hair by giving it a trim.

I know this may all sound a little crazy, especially at the part where I brushed out the doll's hair and gave it a trim.  In my defense, the gift was very well received and I enjoyed making it.

One thing I have realized while trying to write this post is that it is very difficult to describe how I worked a pattern in words.  Next time, I'll be sure to take more pictures of my progress and include them with my directives.  Hope you enjoyed (or at least tolerated) this post.  I have a few gifts I'm working on currently so there will be another one soon enough :)